Helping the average investor ATTAIN KNOWLEDGE GET RESULTS HAVE FUTURE SUCCESS MAKE MONEY

Categories
Crypto Crypto Trading Bots

Bitsgap Review – Grid Trading Bot

Initial Thoughts on BitsGap

I started using Bitsgap grid trading bot back on January 13th, 2021.   Now that I have had over a month of experience with it I wanted to write a review on it.  I started out with a demo account and upon noticing how great the gains it was making were I decided to go all in and upgrade to the “pro” account which allows you to use fifteen trading bots at one time.  There are three plan options to choose from: a basic plan with two trading bots, a middle tier plan with five trading bots, and a pro plan with fifteen trading bots.

Bitsgap works on a grid strategy which means you pick the number of grids you want to have on your trading view chart and then it does the rest of the work telling you how much money/crypto you need to run a certain # of grids on any particular trading pair.  There are several options you can enable to supplement the grid bot.  I will also go over this in more detail below.

Bitsgap also offers signals, and arbitrage trading.  I have not used either one of these services but will give a brief outline below of what I do know about them and how they work.  To use the arbitrage feature successfully I have read you need a larger exchange account (Over $10,000 USD)

Always remember that Bitsgap is a tool you can use to grow your crypto.  Your money remains safe on the exchange of your choosing.  I prefer to use Kraken exchange due to its moderate fees and the best security of any exchange today.  Kraken is also based in the US, and since Im a US citizen this works to my advantage.to 

Click here to check out Kraken crypto exchange

Bitsgap Bot Trading Results

As I mentioned above I have now been running the Bitsgap trading bot(s) for over a month now so there are a couple of things that I probably could have done a little differently but like everything else in life hindsight is 20/20.  So yeah there were a few things I might would have done differently, but since I was a newbie to the platform I was still able to make some very good profits.  

First Month Results

bitsgap first months results
First Months Results with BitsGap Trading Bot
Brief video of my 1st months results with Bitsgap

What about bots that I've already closed out?

You might be wondering how does $4,865 equal to over $10,000 in profit as shown on my video thumbnail?  As you can see in the snapshot above the Bitsgap trading bot was able to earn me a profit of $4,865 with the active bots I had running.  You also have to take into account the profits made by bots that you have closed and are retired now.  Those will be in your “Spot history”.  Below are my results from bots I closed out.  You need to add the closed bot profits to your currently running active bots profits to get an accurate picture of how much profit has been made as closed bot profit does not show up on your active bots tab.  Does that makes sense ?

bitsgap spot history profit results
Closed out bots profits history

Awesome results so far

So to summarize my one month results that I detailed out above you have to add the currently running bots profit to the closed out bots profit.  For just the first month that comes out to $10,298 in earnings.  Pretty spectacular but it gets better.  Another week has went by since these initial profit results were posted on my Youtube channel(see video below) and I have made another $3,228 in profit since then in just one week!  Below are my currently updated profit results for actively running bots.  Remember as I pointed out a week ago the below profit amount was $4,865 and now it shows $8,093!  Awesome results!

bitsgap most recent profit results
1 month and 1 weeks results with Bitsgap

Update video after 1 month 1 week with Bitsgap

How do I get started with Bitsgap?

The first thing you want to do is go to Bitsgap.com.  First you will want to click on the “Sign-Up” button and create a username and password.  After you make your username and password be sure to take a look around and become familiar with the website.  There is a lot of information there so try to take in as much as you can.  Once you feel like you have had a good look around click on the “pricing” link as shown in the snapshot below.  Also check out the 1-minute video they have on the front page to start to get a basic idea of what Bitsgap is all about.

bitsgap front page of website
Bitsgap front page of website

Setting up your first Bitsgap bot

After you have signed up for Bitsgap you will now want to create your first bot.  With your new username and password login to the Bitsgap website.  BE SURE TO SET UP 2FA ON YOUR ACCOUNT.  This is extremely important for security purposes.  I use the Google Authenticator app for my 2FA needs.  The app can be found on the Google Play store and the Apple store.

Initial setup steps for your first Bitsgap bot:

  1.  Signup for an Bitsgap account by clicking here: Bitsgap Sign-up
  2.  Enable 2FA authentication to protect your Bitsgap account
    1. Google Authenticator app can be used to set up 2FA on your phone or tablet
  3.  Login to your account after setup is complete and it will take you to the dashboard area.
  4.  Follow the steps below to set-up a trading bot in either a demo account or a live account

Wanna start with a demo account?

A demo account is a great way to get started with Bitsgap as it will be more forgiving incase you happen to set the bot up in a way that is not beneficial to you at the moment.  It lets you play around with “fake” money so no pressure :-).  Many of the items below also apply to setting up a “real money” account as well.

1) First Step - Make sure "demo" mode is on
2) Second Step- Setup all the parameters for your bot
  1. SECTION ONE (START AT RED ARROW AND MOVE DOWN)
    1. SBOT OR CLASSIC BOT – In the first window you will select the type of bot you would like to you.  There is a choice between classic bot and sbot(new one).  I have the Sbot running on all of my “live” bots at the moment.  Bitsgap says the difference between the two is that the Sbot is better for sideways markets with high volatility and the classic bot is better for markets that move up or down by larger margins.
    2. EXCHANGE – Pick the exchange you would like to use.  The demo version has less exchanges available but still has most of the larger ones that a person would like to use (Binance, Kraken, Kucoin, Coinbase Pro)  
    3. TRADING PAIR – Pick the trading pair you would like to trade.  For beginners I would recommend starting out with USDC or USDT trading pairs as stable coins dont react to bitcoin movement as much and are considered more stable pairs.  Examples would be (BTC/USDC and ETH/USDC).  The first crypto is called the base pair and the second crypto in the pair is called the quote pair.  The quote pair is what you will gain more of with each trade.  BTC/USDC would gain you more USDC, and ADA/ETH would gain you more ETH with each trade. Basically your buying the base pair then selling it back to the quote pair that you want to grow your stash of.  
    4.  INVESTMENT AMOUNT –  Use the slider to pinpoint how much you want to trade in this one particular bot from your total balance on the exchange.  Demo account gives you $50,000 USD to play with.
    5.  LOWER PRICE/UPPER PRICE RANGE – This is where you set your max upper and minimum lower price on the grid.  If the present price falls out side the grid on the lower setting there will not be any trading going on, but on the upper side you can set this to “trailing up” so if the price action goes above the upper grid setting the grid will rebuild itself and be able to make more profits as the price climbs higher.  I would recommend always having “trailing-up” set to “on”.
    6.  TRAILING UP/GRID STEP/GRID # – As I mentioned above I recommend leaving “trailing-up” on so the price action will follow the price upward and rebuild the grid if price keeps increase past your original set grid levels.  Its important to note that the numbers of grids that you decide to use will affect how large your initial investment needs to be.  The grid step defines how much profit you will make between grid levels.  I always aim to make enough so that I will clear .50% profit on every grid.  This is after the fees on your exchange so you need to find what your exchange charges in fees.  Coinbase might charge .50% fee, while Kraken might charge .26% fee.  Binance has around a .10% fee so you can see there is a wide range in the fees that are charged.  An example would be if you want to clear .50% profit and the fee on Kraken is .26% then you need to have a grid step amount of .76% to be able to clear .50% profit per trade.
      1.  Also worth noting is that some exchanges will allow a different number of grid levels.  Kraken is around 80 while Binance will allow 200.  This was learned by trial and error.
    7.  TAKE PROFIT/STOP LOSS –  If you want your bot to take profit at a certain percentage then set this to on, and if you want to set a stop loss if the crypto your bot is invested in starts to lose value you can set a “stop loss” to sell your cryptos in that particular bot and exit the market.  I can see the stop loss being more useful that the take profit because usually if your bot is making profit you dont want it to stop.  
    8. BACKTESTING – After you have set up all the above parameters you can back test the bot to see how it would have performed in the past with the exact same setup.  If you are not happy with the result you can tweak some of the variables and hit back test again.
    9. STRATEGIES – This area contains recommended strategies for the past 3-days/1-week/1-month time intervals.  This is helpful as it shows which coins are pumping and which ones are not.
    10. BALANCE – This will show you how much you have invested in each coin and how much is available at the moment.  Your profit will accumulate here until you decide to either withdraw the profit or stop one of your current bots to reinvest the profit.  Yes, you must stop and restart the bot to be able to add any new investment to it.  
3) Third Step - Start your bot

Wanna start with a live account?

Setting up a live account is very similar to setting up a demo account.  The main difference is that with a live account you have to link your API to the exchange you currently have your crypto funds on.  The demo account uses fake funds so it doesn’t really matter.  This is a good thing as it protects your funds and they remain on the exchange.  Each exchange is a little different with how the API is set up but they are all also very similar with the permissions that must be granted.  Below I will walk you through how to set this up on Kraken exchange.  If you use one of the other exchanges there are tutorials on Bitsgap on the correct settings to use if you search their support files.  Like I said they are all very similar in nature when it comes to setting them up.

Setting up an API for a real money Bitsgap account

  1. Login to your personal exchange of choice.  In this case I will be using Kraken.  
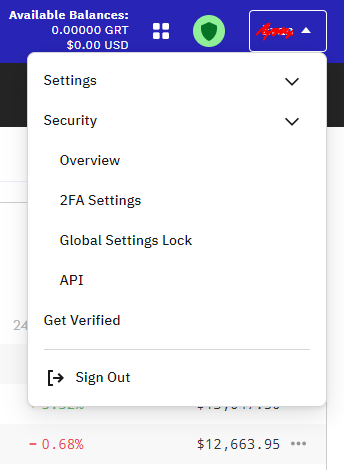
  2. Click on the menu on the right and you will see an option for “API”. Click itkraken api setup for bitsgap
  3.  After you click on “API” you will see the following screen come up.  This is where you will create a new Kraken API key to use on Bitsgap.add api key to bitsgap through kraken exchange
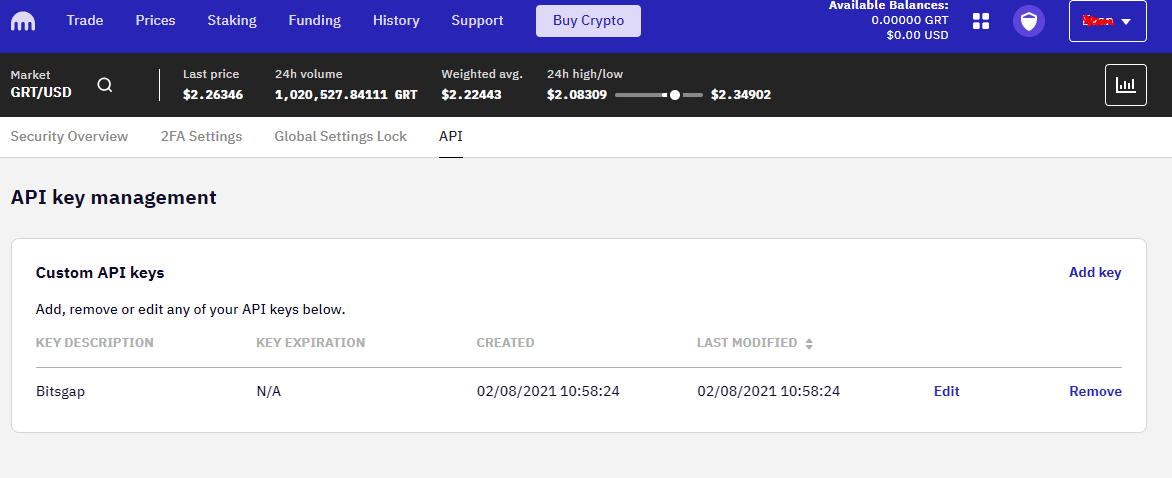
  4.  You will now need to click on “Add Key”
  5.  Go to this Bitsgap tutorial link to finish setting up the API key on Kraken:
    1. https://helpdesk.bitsgap.com/en/articles/3608251-how-to-create-and-setup-kraken-api-key
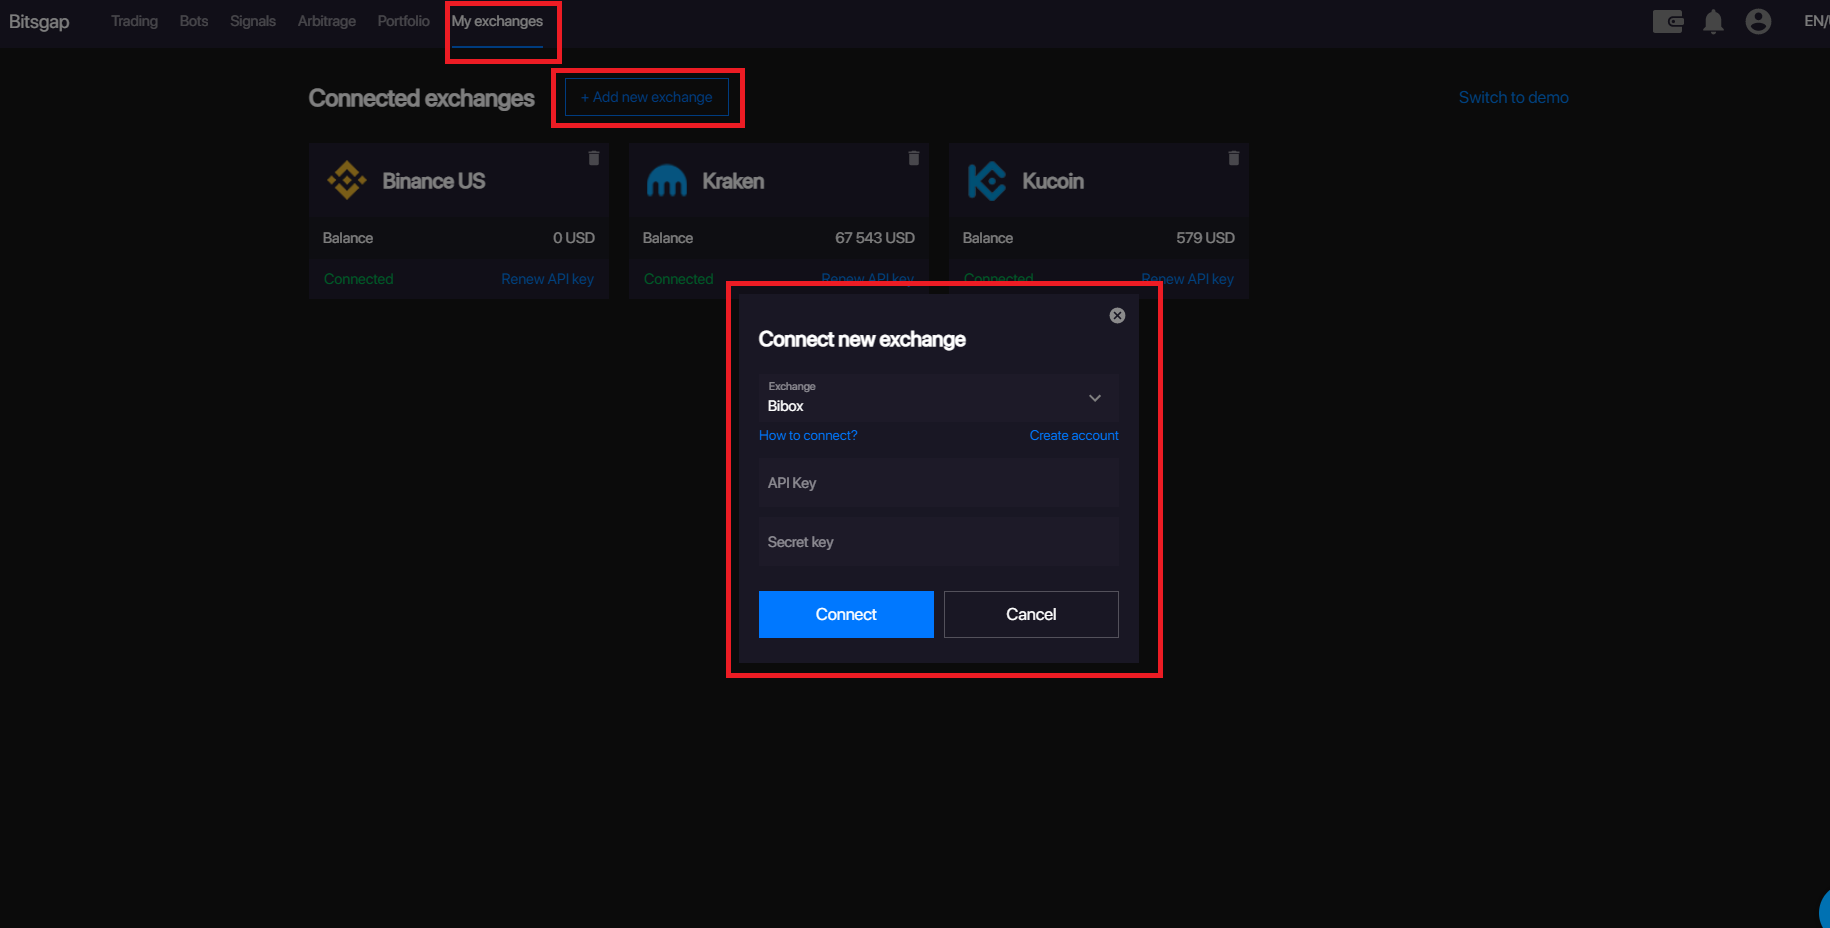
  6. After you have created the API key on Kraken you need to go to your Bitsgap account to enter the details of the key so you can link your Kraken exchange account to your Bitsgap account.  The key secrete will only be shown once on Kraken when you set it up(for security reasons!) so make sure you copy and paste it into the Bitsgap “New API” area before you save the API key in Kraken or else you will not be able to view it again.  
  7. Back on the Bitsgap website you will need to finish setting up the API as shown in the screen shot below:link kraken api key to bitsgap bot
  8.  This is basically the process for setting up any “live/real” API key on any exchange.  Some of the checkboxes might look a little different but they are all very similar when setting them up.
  9.  Once the API key is entered into Bitsgap you can go on to setting up your trading pairs, grids, and profit percentages and start trading! 
  10. Congrats, you made it through this tutorial !

If your interested in signing up for Bitsgap for a 14 day FREE Trail please click on the link button below.  Likewise if you would like to check out The Kraken crypto exchange please click on the banner below.